-
FAQs
-
- Articles coming soon
-
- Articles coming soon
-
- Articles coming soon
-
-
General
- 01147: Facetterm issue with tty's on Fedora Core 5
- BASIS and Oracle Java Licensing
- KB - BASIS Product Compatibility with Java Releases
- BASIS License Manager (BLM) 18 Installation Instructions
- Certificate Options for Web Start
- Jar Registration and Licensing
- How Thin Clients and Desktop Apps Work
- Unresponsive Thin Client
- BLM Log message - EXITING DUE TO SIGNAL 37
- JVM GC Arguments, Java 11 vs Java 8
- BASIS Example Certificate Authority
- Excessive BBj Logging on Last Day of the Year (December 31)
- What It Means That Java 8 Drops Support for ODBC Connections From Java (and thus BBj)
- KB (V)PRO/5 Rev 22 fails to start
- Managing Notifications About Bug and Enhancement Changes
- 00283: How to add new users to an existing BBx license
- 00960: How to find out your BASIS product Serial Number
- 01154: What BASIS products and operating systems cannot use the new composite hostid?
- Coordinating Application Development and Testing BBj Release Cycle
- Licenses Can Be Exhausted from Bots Crawling BBJSP Pages
- Configuring Web Start During a BBj Installation
- Query Analysis Prevents BBjServices Starting
- Enterprise Manager Fails to Load
- PRO/5 Data Server as a Visual PRO/5 Print Server
- Web Start "Application Blocked" Solutions
- Collapsing Licenses Multihomed Windows System
- Creating Bugzilla Reports
- New Oracle Signed JNLP Property Requirements
- SCALL examples for VPRO/5 and BBj
- Effective Problem Reports and Feature Requests
- How Check BASIS Eclipse Plug-in Versions
- Using Modified Third Party Jars in BB
- NoHostIDAvailable
- Restrict Java Web Start Clients to Specific JVM Versions
- Manual Barista BUS Download/Update Process
- How to configure a backup license when using the BASIS License Server (BLS)
- Vulnerability in Apache Log4j Library
- Voting in Bugzilla
- Re-signing BBj's Web Start Jar for Branding
- Sharing BBj Custom Object
- 00942: Must be in "Install Mode" error message
- Removal of Fonts from JDK 11
- OpenSSL and BASIS Products
- 01204: How to obtain product licenses from two separate BASIS License Managers
- 01227: BASIS auto registration process cannot connect to BASIS to get a new license.
- 01215: FLEXlm -114 Unable to check out license after upgrading
- 01130: "Why did my license expire?" and other common questions regarding licenses.
- 01184: How to request a Demo License
- Jetty Webserver: HTTP code 403 (Forbidden) shown for symbolically linked Document Base Directories
- Show Remaining Articles ( 34 ) Collapse Articles
-
BBj ODBC Driver
- KB - ODBC Connection to a Remote BBj Server
- 01106: MS Access Error message: The decimal field's precision is too small to accept the numeric you attempted to add.
- 01143: Tips for BBj and using SourceForge jTDS JDBC Driver for Microsoft SQL Server and other third party JDBC Databases.
- 00898: Y2K Window value does not stay set.
- 01238: Unable to Get Table list BAD HEADER
- 01237: How to handle MySQL with 0000-00-00 dates
- 00901: BBj and BBj ODBC Driver gets "Required connection information missing. Unable to connect"
-
BASIS ODBC Driver (pre-BBj)
- 00710: Read.me REV 2.0 ODBC Driver
- 00293: Installation problems with the ODBC driver
- 00310: fserr=5, fserrs=-21 when connecting to a datasource via the ODBC Driver
- 00791: ODBC Driver doesn't uninstall completely when uninstalled.
- 00725: What the BASIS ODBC Driver 2.02 and Visual PRO/5 2.05 fix
- 00523: Error 77 or FSERR=5, FSERRS=-21 executing an SQL SELECT with an ORDER BY or GROUP BY clause
- 00620: Read.me file for 32-bit ODBC Driver, rev 1.1
- 00873: Invalid Operand error message with ODBC Driver
- 00319: How to speed up queries in Access via the BASIS ODBC Driver
- 00506: List of reserved words for the 1.1 32-bit ODBC Driver and 1.0 16-bit ODBC Driver
- 00771: Which revision of the BASIS ODBC Driver recognizes the new mkeyed filetypes?
- 00495: 'Execute error: Invalid String Size' error when using the ODBC Driver
- 00727: Debug Assertion Error after Installing ODBC Driver Rev 2.02
- 00471: Busy/Timeout error with the ODBC Driver
- 00683: [Basis ODBC Error] Sql Syntx error 1
- 00796: "ISAM Error" running ODBC
- 00661: Information on the ODBC code translator option
- 00511: Microsoft Office 97, ODBC 1.1
- 00294: Log file types used for ODBC driver diagnostics
- 00313: Program samples demonstrating ODBC access from Visual Basic 4, 5 and 6
- 00563: [Basis Odbc Driver]SQL Syntax Err:1(#77) using MS Access - Can't Open Table in DataSheet view
- 00930: Step-by-step instructions for creating a ODBC data source under Windows
- 00675: Fserr=13 Unable to Open File, using the 32-Bit ODBC Driver and NFS Mount
- 00311: When viewing BASIS data from Access, #NAME appears in the field headings and the data is not displayed
- 00331: fserr=61, fserr=-161 when connecting to a datasource via the ODBC Driver
- 00844: ODBC License Files and FLEXlm error -5 - Feature not Supported
- 00494: SQL Date Syntax example for ODBC Driver and SQL Engine
- 00551: State=S1000][Error=77][BASIS] [BASIS ODBC Driver] Execute() file sytem error: fserr=5 fserrs=-21
- 00585: ODBC Driver returns an fserr=19, fserrs=-5 when executing an SQL query
- 00665: An SQL query in MS Access results in ' #Name?' in every field
- 00288: 'No Such Table in Catalog' error with the ODBC Driver
- 00298: Error -7747 in MS Access
- 00864: Cannot configure the BBj ODBC driver after install
- 00571: How to display JULIAN dates in other formats via the ODBC Driver
- 00302: Can the ODBC driver lock a record?
- 00263: 'I/O error during save' error when creating a Data Source via Microsoft Query
- 00406: How to create a Data Source correctly with ODBC Administrator 3.x and higher
- 00649: 'Date Column Suffix' of ODBC Administrator Data Source Setup is Case Sensitive
- 00296: Joins and linking tables via the 1.x ODBC Driver
- 00821: How to set ODBC Driver logging levels without using the ODBC Administrator.
- 00500: Error message with CTL3D32.DLL when installing the ODBC Driver on Windows NT 4
- 00621: Read.me for 16-bit ODBC Driver, rev 1
- 00504: ODBC fserr=1, fserrs=-13, Cannot access dictionary files.
- 00305: Fserr=17 when connecting to a second datasource via the ODBC Driver and Data Server
- 00509: Reserved error (-7778) in Access when connecting to a ODBC data source
- 00318: How to ensure that queries via the 1.1 ODBC Driver are optimized for speed
- Show Remaining Articles ( 31 ) Collapse Articles
-
BBj
- KB - Jaspersoft Studio Changes and BBj
- Invalid SNI message in BBj 24+
- BBj 24.00 CSS Custom Properties and Component Changes
- KB - JVM Tuning: Less Can be More
- BBJ 24+ JAR DIRECTORY CHANGE
- 01102: Connecting to Oracle database from BBj
- 00929: How to resolve a FLEXlm error -1 with BBj products
- 01183: Information regarding the types of Java Pid files
- Migrating to BBJ 19.10
- KB - BASIS Product Compatibility with Java Releases
- 00856: Helpful Operating System Info for running Java products
- 01216: Localization not displaying characters correctly in Window's title bar
- 01127: How to generate a result set to be retuned by a Stored Procedure using direct access to data files instead of SQL
- 01042: How to prevent the JRE from using the XP theme in BBj
- 01048: Function Keys return question marks and/or graphics do not display correctly under Linux
- 01087: How to install BBj 5.0
- 01191: Configurung the BBj IDE to use an older 1.5 JVM
- 01194: Pro5 Rev 8 and BBj 8.3 on AIX requires Maintenance Level 7
- 01214: How to get a list of SPROCs from a BBj program
- 01001: Known issues with Java JRE versions
- 01098: BBj Fails to Initialize on Fedora with SELinux (Security-Enhanced Linux) Enabled
- 00965: Running BBj consumes all available memory
- 00905: BBj Enterprise Manager -Unable to get catalogs for database.
- 01201: Drag-and-Drop Not Allowed Between Two Different Applications in Vista
- 01023: WebStart Applet Does Not Have XP Look and Feel
- 01150: Encryption issue with Solaris and BBJ
- 00998: BBj hangs when starting and attempts to break out of the process cause a core dump
- 01228: Enterprise Manager Unable to Connect to BBjServices on Port 2002
- 01153: Stopping BBj without prompting for a user
- 01231: Sluggish or Unresponsive BBj Cross Look and Feel Applications
- 01120: Two potential problems using a 1.4.2 jre under Fedora Core 3 or higher
- 00915: Special characters in place of the < > are written to the config.ini file upon exiting BEM for BBj 1.10
- 01175: The Uninstaller is Unable to Run in Graphical Mode
- 01234: Why Does My CUI Application Display Slower in a Thin Client Session than in a Terrmconsole Session?
- 01209: User Authentication with WEB Start
- 01232: What will USERS accept in terms of latency in an application?
- 01131: Gui screen remains after BBj session is gone
- 01205: Troubleshooting BBj crashing
- 01065: Registration and Installation of a Redundant BASIS License using the Admin tool in BBj
- 01128: Configuring the IDE to use a specific complier per project
- 01169: Enabling java classes to be used as Client Objects in BBj
- 01166: Excessive Garbage Collection pause times on large BBJ installations.
- 00899: 'Access is Denied' message from Windows when trying to start BLM or BBj
- 01045: Information about pinning programs in BBj
- 01135: How do I install the BASIS IDE?
- 01167: Windows Vista configuration prevents editing or changing files installed to C:\program files\
- 00931: Cut/Copy/Paste in BBj under Linux OS
- 00902: Installing BBj 1.1, WJ View Error :Could not Execute
- 01192: Configuring the Client side JVM memory
- 01222: Trigger Code to Determine and Log Programs Used to Access Data
- 01040: BBj install fails immediately under Windows
- 01008: Combination License FAQs
- 01096: BASIS Product Suite Installation Fails with "Wizard cannot continue" error when installing on Fedora Linux
- 01134: How do I deploy triggers?
- 00953: BBj admin wizard - Cannot Select the Basis License Manager - Unix
- 00982: Differences between BBj Standard Edition (SE) and BBj Enterprise Edition (EE)
- 01074: How to sort a Java Hashtable
- 01136: Command to determine if JVM is a 32bit or 64bit JVM
- 00943: BBj Install - sh: There is not enough space in the file system.
- 01088: BBj revision 5 Install FAQ
- 01210: Barista License Informaiton
- 01078: Changing default location for tmp directory for BBj
- 01019: !ERROR=255 (java.lang.Error: Symbol recycling detected (fix your scanner).)
- 00767: Command to check whether the BBj Services are running
- 01208: How to assign a unique fid for WEB Start clients
- 01083: Equation evaluations are more strictly enforced with BBj than BBx or P5
- 01069: Increasing performance in BBj
- 01185: How to enable WEBSTART client side logs
- 01116: Installing a newer revision of BBj on top of previous version without uninstalling may cause problems
- 01071: IDE is not showing BBx, PRO/5 or BBj file icons
- 01110: BASIS Product Suite Throws "ISDatabase is unavailable" Exception at Beginning of Install
- 01230: How to Clear Java and Browser Cache for Web Applications
- 01057: BBj IDE under Unix not showing BBj specific file associations
- 00904: Install Anywhere Troubleshooting - BBj Install
- 00963: BBjservices will not install or not start on systems with low RAM such as 128MBs
- 01028: Order the config.bbx file will be searched in BBj
- 01055: How to configure MySQL JDBC for use by BBj
- 01189: Java 1.6 Rel 10 experiencing slow repaint issue with MDI Children
- 01104: Notes regarding Basis Advantage Article - " OpenOffice.org - a Sweet New Suite"
- 01039: Sample JDBC configuration for Informix JDBC
- 01095: ERROR=69 returned when BBj PRO5 Data Server accessed incorrectly
- 01149: Multi-user installation of the BASIS IDE
- 01140: Java Exception when changing Complier Settings in IDE
- 00967: Current BBj default ports for the various BBj servers
- 00918: How to check if BBj is branded correctly
- 01199: How do I access the BBj Pro5 Data Server?
- 01004: Setting the directory path where temporary files can be placed for SQL Query sorts
- 01220: Live Migration Cron Job Script for Virtual Licensing
- 01173: Instructions and sample JNLP to be used without a WEB Server
- 00975: BBj seems to be taking two licenses per system. BBj FLEXLM License error: -4: Maximum number of users reached.
- 01172: Modification to BBj Web Start JNLP file to restrict Java versions
- Show Remaining Articles ( 76 ) Collapse Articles
-
BBj Enterprise Manager
-
BASIC Web Utility
- 00718: BASIC Web Utility returns an incomplete set of HTTP headers
- 00702: Program to help see what the BASIC Web Utility Environment looks like
- 00255: BBx PROGRESSION/4 is not supported under Windows NT
- 00885: Troubleshooting Tips for the BASIC Web Utility (BWU)
- 01124: BASIC Web utility Duplicate Name in String Template generating an error 17
-
BBx PROGRESSION/4
- 00525: Configuring DDBuilder to use the Data Server
- 00141: Error 0 under Novell with the following TCB(10) values: -33, 255, 30212, or 30209
- 00541: Error 60, TCB(10)=-2, opening a printer under Novell with BBx 4
- 00617: Read.me file for PROGRESSION/4 rev 2.42
- 00118: Not VCPI or DPMI compatible
- 00344: BBx/4 WAIT function hangs with SCO 3.2.2.0
- 00202: Installing shared memory and semaphores
- 00699: File Size Limitations in BBX4
- 00142: Error 0, TCB(10)=-33, READing a direct file with Windows for Novell PROGRESSION/4
- 00033: Upgrading from PROGRESSION/3 to PROGRESSION/4 changed function keys behavior
- 00304: Error 200 attempting to create a Data Dictionary with a 16-bit DOS BBx
- 00613: Read.me file for PROGRESSION/4 rev 2.4
- 00242: Error 0, TCB(10)=-13, on PROGRESSION/4 Windows when attempting to OPEN a file
-
DDBuilder
-
License Manager
- How to Find Where the BLM and Its License Files are Located on UNIX and Windows Systems
- BLM License File Loading Order
- 00966: How to use the same Basis License Manager for BBj and Pro5
- 00793: Novell Clients get FLEXlm errors -15 or -96 trying to run VPRO/5
- 01072: Protocol Not Supported error message starting BLM under Novell
- 00777: How to shut down the BLM without using the Install script under UNIX
- 01225: Managing a BLM on a Laptop or Mobile Device Where Networks Often Change
- 00992: FLEXlm error - 6
- 00736: FLEXlm Nag Mode and Background Processes
- 00750: FLEXlm error -17 "Cannot write data to License server"
- 00544: Command to get processor type under AIX
- 01082: FLEXlm -9 Invalid host
- 00818: Tips to ensure manual license file installation is correct
- 00892: Configuring the BLM to go through a TCP/IP firewall
- 00941: FLEXlm -14 when printing to a spooler
- 00769: FLEXlm Node Locks to the Boot Drive only
- 00755: FLEXlm: License cannot be found / How to manually Brand the Pro5 Executable
- 00964: TCP/IP Hostname Resolution and the BASIS License Manager (BLM)
- BASIS License Manager (BLM) 18 Installation Instructions
- 00923: Reasons for a FLEXlm error -16
- 00870: Kernel Parameters that will help with FLEXlm error -97
- 00883: FLEXlm error -25 when starting or in BLM logfile
- 00880: FLEXlm Error -18: Possible causes and resolutions
- 00834: Options available under LMUTIL program
- 01061: Speed considerations when searching for FLEXlm license files
- 00805: How the BLM determines whether to check out a second license.
- 00824: Hostname has changed on a UNIX system running the Basis License Manager
- 00950: Configuring the BLM to work with another software vendor FLEXlm License daemon
- 01162: BLM issue with new BBj Itanium port
- 01229: How to Disable IPv6 on Linux
- 00908: FLEXlm error -57 under Windows
- 00972: Helpful background information about FLEXlm license files
- 00776: FLEXlm error -15,12
- 00753: FLEXlm Error 1,359 when invoking Pro5
- 00744: FLEXlm corrections to ensure the BLM autostart script works under SCO, AIX and Linux
- 00956: Troubleshooting FLEXlm error -12 on TCP/IP networks
- 00806: 'Invalid or corrupt license file' error message when installing a Basis License
- 01003: FLEXlm Error = UNSATISFIED LINK
- 00757: Globetrotter Bug with FlexLM Applet under Windows 95/98
- 00888: FLEXlm error -97 under Unix
- 00817: FLEXlm Error -34, Clock Difference too large between Client and Server
- 00970: BASIS License Manager (BLM) Vendor daemon died with status 28
- 00936: Creating a basis.opt file for the BASIS License Manager
- 01207: Can the BASIS License Manager run in a virtual environment?
- 00234: FLEXlm error -1,359:2 returned from status (FlexLM -15 connecting to P5 DS)
- 01014: BASIS Automatic License Installation Program
- 00900: FLEXlm node locks to Dial- Up Adapter when no NIC card present
- 00899: 'Access is Denied' message from Windows when trying to start BLM or BBj
- 00954: BLM will not Start on Sun Solaris, FLEXlm error -16
- 00959: Error 1067 Process Terminated Unexpectedly when starting the BLM under Win2000
- 01000: BLM script incorrect
- 00795: Possible Reasons for FLEXlm error -5
- Auto Licensing Failed to Return a New License
- 00807: Process to determine if someone is on SCO HOST EDITION
- 01049: FLEXlm error -21 or FLEXlm error -83 License File does not support this version
- 00823: How to turn off logging for the Basis License Manager in Windows platforms
- 00789: Novell BLM install Fails - out of disk space error
- 01037: Red Hat Linux 9 and BLM 8.4
- 00742: FLEXlm Error -96 and How to Resolve
- 00881: How to turn off logging for the BASIS License Manager under Novell
- Show Remaining Articles ( 45 ) Collapse Articles
-
Other
-
PRO/5
- 00848: Establishing Socket Connections
- 00207: Information on BBxPLOT
- 00680: How to tell if PRO/5 2.0x for Unix is SQL Enabled
- 00493: How to transfer program and data files from Unix to DOS (and vice versa)
- 00120: BBx register dumps on invocation
- 00096: Conversion: Open Basic to BBx notes
- 00060: Alias line for printing to a file
- 00111: DOS return codes are not valid
- 01114: Cannot create 64-bit file on AIX enhanced journalled filesytem (64-bit)
- 00232: Remapping the arrow keys in the termcap file, using a Wyse 60 as an example
- 00660: Demo program to read data from a Comma Delimited ASCII file and write the records into a BBx MKEYED file
- 00666: Clarification of the documentation re: the command PRINT 'RGB'(hex_value)
- 00069: Escape sequence to force a laser printer to print double-sided copies
- 00022: Program to print the file access count
- 00104: Conversion: Converting From Other BASICs to BBx under Unix
- 00132: BBx compatibility with a non-Microsoft multi-user operating system
- 00711: Read.me REV 2.03 VPRO5
- 00565: Information and examples for printers, pipes, and spooling
- 00192: How to prevent escape codes from showing up in an application when using function keys
- 00126: Error=0 or 60 under Lantastic network
- 00020: Error 33 loading functions keys with the 'FL' mnemonic
- 00041: Error 12 when using _DDEDIT.UTL
- 00206: Fine tuning Xenix/Unix
- 01031: How to force all lower case charcters using INPUTE
- 00003: Error 0, TCB(10)=-13, when accessing a file on an NFS mounted drive
- 00034: What is the maximum length for a global string table name?
- 00635: Reading a file on a CD returns ERROR=13
- 00108: Error 0, TCB(10)=-101
- 00231: Wyse 325 color termcap entry
- 00721: Error 2 when reading or writing a file
- 00382: Core dump under SCO Xenix with a template containing a float and/or double type
- 00023: Advanced examples for loading function keys
- 00977: FLEXlm -3 No server for this feature
- 00347: Graphic characters are are not displayed properly under SCO Openserver 5
- 01105: FlexLM error -8, Invalid (inconsistent) license key using BASIS License Manager version 10
- 00345: Core dumps with direct and spooled printers under SCO
- 00220: How to setup the CONFIG.BBX file for pseudo tty's
- 00233: BBx chooses the incorrect alias line from the config.bbx file
- 00002: Introduction to the Openport program
- 00271: C program that demonstrates bbx style lock method
- 00205: Ghostly Tales From the BBx Crypt - A Look at Ghost Tasks in Depth
- 00043: An introduction to advisory locking
- 00894: Installing PRO/5, " syntax error in /etc/default/lang file"
- 00572: Advantage article regarding the chklck script
- 00237: How to add new users to an existing BBx license prior to PRO/5 Rev 2.1x
- 00013: How to determine the lockbyte used for a file
- 00622: Color Xterm termcap entry for PRO/5 under Unix
- 00127: Decription of how the FCBCACHE config.bbx parameter works
- 00001: BBx programs demonstrating how to communicate with a modem
- 00801: Explanation of FLEXlm Licensing vs Foreground Background sessions of older Releases
- 01118: Flexlm -1 on Sun Solaris
- 00189: How to determine what the TCB(10) values mean under the Unix operating system
- 00123: Displaying 132 columns
- 00438: List of possible causes for an FSLOAD Error 13
- 00536: 'Semaphore Initialization Failure' when running a PRO/5 1.05 on Unix
- 00006: fs load err=30 - PRO/5: unable to open channel 0
- 00463: Definition of dependent and independent indices
- 00407: Error 77, SQLERR() function returns an empty string
- 00109: File corruption under DOS, Windows, Novell
- 00152: FSLoad Error 70--too many users under Novell NetWare
- 00723: Fsload error 34 when installing Pro5 under Unix
- 00594: Printing to a device under UNIX results in a TCB(10)=-4
- 00664: PRO/5 ignores modes when the alias line is incorrect
- 00619: Read.me file for PRO/5 rev 1.05
- 00570: ERROR=77 (SQL connect or execution failed). Execute error: template/field error when executing an SQL Update
- 00651: ERROR 33 when creating a window via the 'WINDOW' mnemonic
- 00696: Incorrect TIM being returned under Linux
- 00502: Printer alias lines are restricted to writes only
- 00872: ERROR 16, TCB(10)=-46, on UnixWare when FLCKREC is maxed
- 00377: Error 13 occurs when attempting to edit a line in IO mode
- 00476: Possible reasons for an ERROR 18
- 00512: Error 33 - How to free up conventional memory in DOS
- 00188: Error 16, TCB(10)=-46 or -49, under Unix: TCB(10)=--37 under Linux - No Record Locks Available
- 00083: Error 26 at line 7060 in BXRCV
- 00636: Attempting to convert a file in _p4conv causes an Error 2
- 00820: Error=26 in BXRCV on Line 2140 indicates bad utility set
- 00005: ERROR=29 occurs when trying to send an escape sequence to a printer
- 00716: Maximum length of the start program name under BBx
- 00668: Opening a file under Novell may result in an error 18 instead of an error 12 after updating the product, OS, or client kit
- 00276: How to access Unix printers from a TCP/IP client
- 01006: Graphic, termcap, Font and attribute issues with RedHat Linux 8
- 00361: How to calculate the size of an MKEYED file
- 00009: Comparison between MKEYED and DIRECT files
- 00039: Character limit for the MODE string on an alias line
- 00650: Error 46 when executing a BBx SELECT with a SORTBY clause
- 00519: Possible reasons for an ERROR 41
- 00145: Error 17, TCB(10)=-15 or -21, when creating a file
- 00210: Error=0, TCB(10)=-32, when printing under Unix
- 00017: How to READ the last key in an alternate non-unique chain
- 00097: Conversion: Open Basic--another modified program
- 00719: Error=0, TCB(10)=-32, when printing under Unix to a remote spooler
- 00153: Error 0, TCB(10)=-32, when removing a directory under Windows NT
- 00107: ERROR 0, TCB(10)=-33
- 00478: Error 47 when viewing records in DDEDIT
- 00045: Calculating memory usage for BBx
- 00578: How to change Visual PRO/5's window colors so it looks like a PRO/5 for DOS
- 00679: How to access 4 Gigabyte Files with PRO/5 2.0
- 00826: Termcap entry for Unixware 7 - AT386
- 00021: Solving an FSLoad Error 70 on Unix
- 00499: Problem with the ALL keyword and arrays in PRO/5
- 00052: Dynamic mkeyed file grows disproportionately large
- 01052: Pro5 Rev 5, pro5 is no longer a executable under Unix
- 00783: Modes Available and Sample Code for TCP & UDP Sockets
- 00221: Unix scripts to dynamically assign a FID(0)
- 00641: Possible cause of an !Error 46 when attempting to write to an MKEYED file
- 00058: Using BBx as a parser with input and output pipes
- 00113: EKB and loading edit keys with a DOS BBx
- 00227: Termcap for Hewlett Packard 700/92
- 00545: Running BBx / PRO5 on multi-processor systems.
- 00007: Error 46, TCB(10)=60, on a SELECT statement
- 00595: TCB(10)=-4 under DOS, Too Many Open Files
- 00867: Error=17 occurs if the IP Address is used instead of hostname with TCP Client
- 01223: !ERROR=18 (Illegal operation or permission denied (tcb(10)=-5)) Attempting to Open a File Via the PRO/5 Data Server on Windows
- 00480: Sample CONFIG.TPM file for use with _DDEDIT.UTL, DDBuilder, or the ODBC Driver
- 00053: How to find out what level a BBx program is saved as
- 00031: Sample programs to load function keys for INPUT, INPUTE, INPUTN verbs
- 00183: Setting the context for a Novell printer on the nspool alias line
- 00004: Error 0, TCB(10)=-33, OPENing files due to single-user license
- 00379: The default COLS= value changed in PRO/5 rev 1.04
- 00625: Converting earlier BBx applications to PRO/5
- 00012: How to export your BBx data files to ASCII
- 00488: How to change the name and location of the output file created by Pro5cpl
- 00552: Sample code to pack and unpack decimal numbers into IBM's packed decimal format.
- 00798: Sample Program to Send Mail Messages through PRO/5 Socket
- 00213: Graphic device alias line example
- 00018: Rebuilding corrupted MKEYED files
- 00553: Unix operating system parameters that impact PRO/5
- 00048: Memory usage in called programs
- 00631: Printing a long string to the printer generates an ERROR=1 (end of record), TCB (10)=2
- 00115: QEMM: fatal error:xms memory corrupted
- 00549: Linux console termcap entry
- 00077: Reading and writing to tape in a program
- 00236: The TIM variable reports a different time than the Operating System
- 00253: Tip for using the 'BU' mnemonic
- 00307: Troubleshooting TCP/IP connections to the Data Server via the TCP/IP Client or the ODBC Driver
- 00241: Error 0, TCB(10)=-101, occurs on Windows when creating a file
- 00362: Creating an MKEYED file with same charateristics as an existing file
- 00146: Error 18, TCB(10)=-5, when creating files on Novell NetWare
- 00887: Program to shrink MKEYED files by rewriting keys in non-sequential loop iteration.
- 00135: The Bindery vs. Directory Services
- 00214: Problem with the lockfile mode under Unix
- 00203: TCB(10)=-25 under Unix
- 00369: PRO/5 SELECT verb fails with an Error 46
- 00095: Conversion: LISTING.BB7 modified for Open Basic
- 00025: General overview for 'FL', 'EL', !EDIT, !TERMS, STBL
- 00732: Sample program to convert a Julian date to the numeric week of a year
- 00591: TCB(10)=-27 under SCO Unix
- 00204: Troubleshooting activation problems
- 00057: Unprotecting BBx programs
- 00079: General Instructions for Conversions
- 00080: Conversion: BASIC 4 2000 3000 4000 data files
- 00534: Problem printing a large file to the Unix print spooler
- 00230: Troubleshooting printer problems under Unix
- 00071: Removing extra form feeds when using a slave printer
- 00836: Using Facetterm: All screens just lockup with the value "\E\Ettyname" on the screen
- 00050: Troubleshooting startup failures in BBx
- 00010: Description of MKEYED files: Bayer b-tree
- 00219: Printouts to a direct Unix printer are missing the last few lines
- 00577: Printing a graphic using all versions of PRO/5
- 00149: Error 60, TCB(10)=30209, 35327, 255, OPENing an nspool printer
- 00584: Error 17 when trying to load a program
- 01053: PRO5 Rev 5 : error while loading shared libraries
- 00780: Dynamic linker ./pro5b cannot open /usr/lib/libsocket.so.2
- 00321: Manual: SETOPTS function
- 00076: Slave printing codes for WYSE 50 & 60 terminals
- 00066: Maximum value for COLS on a printer alias
- 00026: More function key loading examples
- 00700: Possible installation and Activation Problems with PRO/5 2.0x under UNIX
- 00537: Error=60, TCB(10)=-1, when OPENing a file on a DOS or Windows platform
- 00072: Error 0 after printing a few pages
- 00813: Error 7's with PRO5 Rev 2.x and higher
- 00056: "ERROR= 30 (BAD PROGRAM)", when trying to run _ddedit.utl
- 00195: How to bypass the I/O buffer when writing to a pipe
- 00147: List of possible reasons for Error 30
- 00482: ERROR 33 when invoking PRO/5 under UNIX
- 00027: Miscellaneous information on loading function and edit keys
- 00724: Error 36 Call/Enter Mismatch
- 00279: Reading or writing to tape via BBx or PRO/5
- 00582: Possible reasons for an ERROR 4
- 00624: Maximum number of characters of the prefix line
- 00117: Opening a /dev/lpt printer alias may return an error or the print job disappears
- 00365: Programs demonstrating SQL access to an ODBC-defined datasource
- 00134: Using environmental variables in the CONFIG.BBX file
- 00019: Loading edit keys explained in detail
- 00055: Shortcut keys in BBx
- 00865: User Defined Functions to return Date of Week from Week Number entered and Week Number from Date Entered
- 00483: Notes on using the _FIX utility
- 00074: Slave printer codes for ANSI or VT100 terminals
- 00228: Termcap for Wyse 30
- 00282: How to print images via a non-Windows BBx
- 00479: Error 49 when running _DDEDIT
- 00847: Printing directly to a port sometimes loses the last few lines of the report.
- 00028: Problems loading function keys under Unix
- 00196: Running a BBx application as a daemon with I/O redirection under Unix
- 00698: LLPlus Spooler and AIX ignoring Form Feed
- 00122: Slow performance with DOS/Novell 386 products
- 00064: Sending escape codes to a printer by utilizing the BO and EO mnemonics
- 00799: After upgrade a report with greater than 80 columns used to work returns an Error=1
- 00190: Unix shell script to automatically assign unique FID(0)'s to Facetterm sessions
- 00317: When a telnet session is killed or a modem line is dropped, a running BBx application will not exit properly
- 00746: SCO Spooler Killing Direct Print Jobs
- 00320: Manual: INFO function
- 00280: Possible causes for a BBx error 16
- 01107: Error=0, TCB(10)=-32, when printing to spooler in AIX
- 00819: Moving PRO/5 and the BLM after it's been installed.
- 00042: ERROR=4 (DISK/DEVICE NOT READY) when trying to run the _ddedit.utl utility
- 00209: How to print multiple copies via a Unix printer alias line
- 00067: How to create a printer alias, with examples for an HP laser jet
- 00068: Alias to print to a file and printer simultaneously
- 00044: Advantage article describing file locking in BBx
- 00217: Spooled printers and lock files
- 00229: Using stty to modify the system interrupt under Unix
- 00154: NetWare version of BBx hangs on invocation or Network Shell error
- 00686: INODE can be reused if a large number of files exist under UNIX
- 00015: OPENing a file takes a very long time
- 00106: IBMCOM1.SYS drivers
- 00024: Loading function keys explained in detail
- 00472: FSLOAD error 17 after adding an alias to the config.bbx file
- 00800: How to resolve FLEXlm Error -5 with 2 products using a License Manager
- 00825: Instructions on upgrading to PRO5 REV 2.23 from PRO5 REV 2.10, 2.20, or 2.21 for Unix
- 00016: How to READ backwards after hitting the end of a mkeyed file
- 00129: Sharing Violation, Multi-User License Not Recognized on second invocation
- 00168: Lock of the header problem under Novell Ports
- 00075: Slave printer codes for 4309, 4313, 7270, PC-LINK, and other MAI terminals
- 00285: VSI-FAX alias example
- 00758: Info(2,4) Now returns 4 byte value
- 00990: Xterm Color termcap for Linux
- 00863: FCBCache turned on disallows file type changes.
- 00567: Slave ON and OFF codes for various terminals
- 00187: Error 16, TCB(10)=17, on an OPEN of a pipe under Unix
- 00560: How to calculate the optimal value of the config.bbx file's STBLEN parameter
- 00215: Setting the baud rate and handshaking protocol for an aliased serial device
- 00059: Using the 'TR' mnemonic to read in the current screen
- 00628: How to improve READ/WRITE time to an ASCII file
- 00225: Termcap entries for NCR and ADDS Viewpoint terminals
- 00558: How to print an alignment page
- 00616: Read.me file for PRO/5 rev 1.06
- 00030: Sample program to load INSERT and DELETE keys
- Show Remaining Articles ( 223 ) Collapse Articles
-
PRO/5 Data Server
- 00433: Error 8, accessing file via Data Server
- 00720: Error 2140: An internal Windows NT error occured when starting the PRO/5 NT Data Server as a service
- 00763: Rev 2.20 PRO5 Data Server when invoking states Field Test
- 00589: TCB(10)=-10061 or RUSEROK Failure in Data Server Log
- 01240: Error 12 TCB(10)=13 attempting to open file via Pro5 Data Server
- 00340: Tests for troubleshooting the Novell Data Server
- 00924: Config.bbx parameters for Pro5 Data Server connecting to BBj Data Server
- 00266: How much memory does the Unix Data Server use?
- 00984: Enhancing Your Data Server Configuration
- 00712: Release Notes Rev 2.03 Data Server
- 00260: How to solve an error 72, gethostbyaddr failure
- 00722: Adding a second DNS or LMHOSTS Entry for resolving Host Name
- 00586: ERROR=151 accessing Data Server
- 00705: UNIX Data Server speed is really slow with reads/writes or large records, but very fast when dealing with smaller records
- 00180: Error 60, TCB(10)=-161, opening a file via the Data Server
- 00748: Error 18 or 13 when trying to erase, create or write to file via Data Server under NT.
- 00707: Release Notes for Data Server NT REV 2.02
- 00590: Winsock error 10044, ESOCKTNOSUPPORT issued when starting the PRO/5 NT Data Server -10044
- 00262: Cannot start the Data Server due to a 'gethostbyname failure'
- 00713: Mapped drive performance is slow for more than one user
- 01060: Using ResBuilder to build graphical screens isn't displaying the Properties page for forms and controls within ResBuilder
- 00130: A Unix Data Server is being repeatedly killed by the operating system
- 00897: Error 8 connecting to PRO/5 Data Server (also seen as fserr=9)
- 00557: Error 72, TCB(10)=-10054, error getting packet size (Winsock error 10038)
- 00910: Error 33 opening a file via the Novell Data Server
- 00265: Error 70 when trying to open a file via the Data Server
- 01224: !ERROR=70 (Network user error) Opening Channel to PRO/5 Data Server on Unix
- 00678: NT Data Server no longer has issues with DHCP as of version 2.0
- 00490: Error 69 when accessing Data Server with the Visual PRO/5 Client
- 00275: Addressing performance problems with the TCP/IP Client and the Data Server
- 00259: Opening a file via the Data Server under Unix results in an Error 0, TCB(10)=-115
- 00520: Guidelines for configuring the NT Data Server
- 00492: Error 12 when trying to OPEN a file via the Data Server
- 00543: SNMP.NLM corrupting CLIB.NLM causing Novell Data Server to fail with an Error 12
- 00949: PRO/5 Data Server for NT and Visual PRO/5 performance information
- 00426: READ.ME for PRO/5 Data Server (TM) for Windows NT REV. 1.05
- 00623: Data Server keeps files open after client abruptly shuts down
- 00264: Error binding stream socket: address already in use, when using the Data Server
- 00078: Error 60, TCB(10)=1, when opening a file via the Data Server
- 00642: How to perform an SCALL to a Data Server that calls a UNIX Script
- Show Remaining Articles ( 25 ) Collapse Articles
-
ResBuilder
-
TAOS: The Developers Workbench
- 00944: Installing TAOS on Red Hat Linux causing error
- 00437: Missing 'tc' with TAOS 1.3 on AIX
- 00743: Unable to Compile Taos Procedure
- 00453: _outdev.utl doesn't print compressed
- 00535: Compiling a TAOS procedure larger than 64kb receives "fatal error--out of program buffer space--use -m switch"
- 00452: Notes regarding TAOS upgrade to rev 1.31
- 00440: In Taos, a header displays on the screen as well as in a printout
- 00762: What are the .bba and .fba files under TAOS
- 00173: BBX4CPL.EXE: Fatal error - unable to open file when compiling
- 00443: How to brand the Taos Compiler executable by hand
- 00527: TAOS form and procedure size limits
- 00436: Error 1 when branding TAOS on AIX
- 00454: Tips for troubleshooting a TAOS 1.31 install
- 00528: Compiled TAOS form is named with two extensions
- Typical BBj Load Balanced and HA Cluster Deployment
-
Topology
-
Visual PRO/5
- 00485: Example code showing how to read and write to an MS Access Data Base from Visual PRO/5
- 01133: Function Key sample for adding F10 & CTRL+C to the bindings for the RESTORE command.
- 00415: Failure to open a resource file due to inadequate permissions
- 00601: MS DOS and Windows, TCB(10)=-59, unexpected network error
- 00248: Error 0 when OPENing the same file using different naming conventions
- 00381: Error=18, TCB(10)=-5, when opening an LPT device
- 00418: Obtaining information about a context in Visual PRO/5
- 00062: How to determine the CPI and POINT size of the SYSPRINTer's font
- 00985: Explanation of time interval for short cues to disappear
- 00645: Error 41 opening a sysprint device
- 00738: GPF in gdi.exe when starting Visual PRO/5 1.05
- 00869: Error 46 on SENDMSG 80 binding to a Data Aware Grid
- 00388: Error 60, TCB=-16389, using DDE with Visual PRO/5
- 00839: Unloading BASIS.nlm causes error
- 01011: Error=0, tcb(10)=-32 calling a program in VPRO/5
- 00829: !ERROR=12 and `RESOURCE' Mnemonic
- 00676: The Windows Dial Up Adaptor Dialog always comes up with the first connection to a Data Server
- 00124: This version of MSVCRT40.DLL is not compatible with Win32s
- 00688: Status Bar Sample code
- 00768: Troubleshooting Novell BLM Configuration issues
- 00417: List of possible SYSWINDOW modes
- 00701: How to revert to the older, character based model of editing a line of Visual PRO/5 code.
- 00814: Switches to restrict VPRO/5's SQL engine to search native Databases or ODBC Databases.
- 00157: Error 12 using the Novell 32bit Client Kit for Windows 95
- 00759: GUIBuilder Functions for Reading and Updating the Screen: Setting and Querying List Selections
- 00398: On Windows 3.x, executing Visual PRO/5 causes the screen to blink for a second then go away
- 00521: Using 'ENDSPOOL' mode with a SYSPRINT device
- 00176: Synchronous SCALL versus asynchronous SCALL
- 00416: Specifying a path to resource files or bitmap images
- 00413: Unable to print more then 85 columns using the Generic Text printer driver
- 00653: Using the 'FONT' mnemonic to affect the size of COLS and ROWS
- 00832: Windows 2000 and Visual PRO/5 rev 2.22
- 00644: How to easily change the fonts for all controls in a GUI window
- 00352: Control-Break no longer works under Windows 95
- 00938: PRO5DS will not load on a Mirrored Novell server system
- 00250: How to capture a printer port under older versions of Windows
- 00598: MS DOS and Windows, TCB(10)=-112, Disk Full
- 00694: Problem with Windows 98 and the Microsoft Client for NetWare
- 00988: Print Preview error "Invalid argument, unable to find path to Metafile"
- 01163: Running Vpro5 from a mapped drive in Vista
- 00626: How to immediately view a report that has been printed to a file
- 00412: Printing a bitmap image using Visual PRO/5 1.05
- 00677: Printing SQLTABLES(sqlchan) does not return any table names for data sources listed in the SQL.INI file
- 00995: Computer infected with virus can lose drive mappings causing VP5 to return errors
- 00240: Call to undefined dynalink error when invoking a Windows product
- 00410: How to change the font with a sysplot device
- 00672: How the ACTW.EXE program changed for BASIS Windows-based revision 2.0 products
- 00741: Error 115 returned when installing P5 2.1 without long filename support
- 00559: How to set the icon for the Visual PRO/5 Window
- 00174: GUI program that demonstrates the use of PLOTTEXT
- 00353: How to determine the version of Windows 95
- 00182: Long startup times or invocation of TCP/IP Visual PRO/5 client dials CIS or PPP server
- 00792: Novell BASIS.NLM will not load
- 00555: Error 70 using DDE
- 00731: Setting Multiple Row Values for the Grid Control
- 00610: MS DOS and Windows, TCB(10)=-21, drive not ready
- 00614: Error 60, TCB(10)=-16389, during a DDE write
- 00393: Program demonstrating the use of fonts for GUI controls
- 00772: Error 11, TCB(10)=-87 or TCB(10)=-1801 opening a sysprint printer
- 00886: Moving Visual PRO/5 from one PC to a different PC
- 00638: Novell Client 32:Error and Update Information
- 00802: Error=29 using FONT Mnemonic with a SYSPRINT Device
- 00600: MS DOS and Windows, TCB(10)=-53, bad netpath
- 00513: Notes on PC-Anywhere remote printing and Visual PRO/5
- 00643: Overview of how to setup the Visual PRO/5 SQL Engine to communicate with an external ODBC Driver
- 00358: How to capture a printer port under Windows
- 00385: DDE topics and items for Program Manager
- 00607: Novell, TCB(10)-88, ERROR_OPENING_FILE
- 00368: Redirecting printer output to /dev/null under Windows 95
- 00830: Cannot print in landscape orientation
- 00604: Error 18, TCB(10)=-5, Access Denied, under MS DOS, Windows, and Novell during file access
- 00548: Is Universal Naming Convention (UNC) support under Visual PRO/5?
- 00877: GRID cells seem to loose data, or Grid doesn't seem to scroll correctly through all the data
- 00627: How to prevent BBx for Novell from destroying an existing print capture
- 00703: How to Print to a File Using Universal Naming Convention (UNC)
- 00386: DDE topics and items for web browsers
- 00139: Cannot find NWCALLS.DLL or CALWIN32.DLL error message when trying to run VPRO/5 on Novell
- 00895: Known Issues with the Novell 2.71 client kit for NT/Win2000
- 00785: Creating a multiple image list file - (image.bmp file)
- 00518: GPF in WSOCK32.DLL using the ODBC Driver or Visual PRO/5 TCP/IP Client
- 00618: Causes of "unknown fileset errors" during installation of a Windows product
- 01218: After upgrading to VPRO/5 10.00 or higher, GUIBuilder-generated applications fail with an error
- 00167: How to use the 'FONT' mnemonic/mode in a program and in an alias line for a SYSPRINT device
- 00925: FLEXlm error -12 connecting from VPRO/5 rev 3.10 client to a Novell BLM
- 00597: Windows Clients appear to hang during file access
- 01164: Error 12 opening device or printer alias line on Windows platforms.
- 00394: List of .dlls used by Visual PRO/5 under Windows 95
- 00849: Error=150 - Verb not implemented or supported when using BACKGROUND verb
- 00879: Error 17 using CHDIR in Vpro5
- 00629: How to find out how a Windows machine's TCP/IP stack is configured
- 01076: Instructions on running Vpro5 silent install
- 00932: Vpro5 Console displays a dot under every character
- 00715: Visual PRO/5 runs on Citrix and Windows NT 4.0 Systems
- 00633: Error 18, TCB(10)=-5, Access Denied using any Windows PRO/5
- 00681: Vpro5 Rev 2.x writes information previously contained in PRO5.INI to the Registry
- 00556: When using a SYSPRINT printer, an undesired formfeed is sent after each page
- 00745: Sample Program Using Plottext and Pwindow to Change Font on Printed line
- 00396: Using the -a and -n Visual PRO/5 command line parameters to retain user preferences
- 00278: Setting SYSWINDOW to display more than 80 columns
- 00508: Sample Visual PRO/5 program that prints all the fonts installed on the system
- 00602: Occasional Error 0's with a TCB(10)=30209 on Novell
- 00838: Recommendations for improving performance when remotely connecting to a Windows NT 4.0 Server
- 00853: Setting background color in a main or child window
- 00364: Error 0, TCB(10)=-33, when opening a file twice via different names or cases
- 00389: Program example demonstrating communicating with MS Excel via DDE
- 00391: Program example demonstrating Visual PRO/5 running a WordPerfect macro via DDE
- 00390: Program example demonstrating DDE to Program Manager
- 00422: Error 0, TCB(10)=-36 or -32, when OPENing a file under Windows for Workgroups
- 00484: _FLIST.UTL or other utilities report an error 1
- 00952: Error 13 TCB(10) -4104 when opening a printer
- 00684: 'RESOPEN' on a .brc file causes an Error 17 TCB(10)=-2 in Visual PRO/5 version 1.0x
- 00419: Using the CTRL() function to obtain printer information
- 00609: Opening a printer results in an ERROR=14, TCB(10)=-3 under Windows
- 00822: ORA-12154 error trying to SQLOPEN an Oracle Datasource from Visual PRO/5
- Show Remaining Articles ( 99 ) Collapse Articles
-
BLS - BASIS License Service
-
Deprecated
- 00639: Installation Read.me for the BASIS CD ROM disk
- 00793: Novell Clients get FLEXlm errors -15 or -96 trying to run VPRO/5
- 00293: Installation problems with the ODBC driver
- 00137: How to load the NetWare Client Kit VLMs into conventional memory
- 00787: Netware client GPF's when trying to check out a license under NOVELL 5.0
- 00770: FLEXlm Error -18 Under Novell Netware 4.2
- 00136: NetWare Client Kit optimizations and configurations for speed
Restrict Java Web Start Clients to Specific JVM Versions
Under certain circumstances it may be desirable to restrict Java Web Start clients to a certain JVM Version. For example, Java 1.7.0_25 is known to break character-based web start-launched applications in BBj 12.x through BBj 13.01.
This knowledge base article discusses the steps necessary to prevent Web Start clients from upgrading to Java 1.7.0_25 until you are ready to upgrade to the latest BBj version that resolves this problem.
The are two components to restricting Java Web Start clients to a certain version of Java:
-
User version restriction within the JNLP to prevent newer JREs from being used on the web start client.
-
Prevent Java updates on the Windows client.
JNLP Version Restriction
BBj Jetty-Configured JNLP
Follow these steps to add version restriction to a JNLP configured to run via the BBj Jetty web server:
-
In Enterprise Manager, select the JNLP Configuration module.
-
Under the JNLP configuration, expand the Resource Section and the Default child node.
-
In the Java Version field, enter the Java version to which you wish to restrict your web start clients. You may either restrict your clients
— to a specific minor JRE version, for example: 1.6.0_45
—-OR
— to a major JRE version with a ‘*’ wildcard, for example: 1.6* (see Figure 1) -
Click Save.

Figure 1. Changing the Java Version in the Enterprise Manager JNLP Configuration module
Version Restriction in Apache or IIS-served JNLPs
For Apache or IIS-served JNLP files, simply add the following property to the JNLP file, under the resources section:
<resources>
<java version=”1.6*”/>
Preventing Automatic Updates on Windows PCs
Oracle includes automatic updates with JRE installations on Windows PCs. These updates might install a JRE version that is higher than the JNLP version designation. Follow these steps to prevent Oracle automatic JRE updates on the client.
Note: In Windows Active Directory domains, Java updates may be disabled with Group Policy. See Microsoft Group Policy documentation for instructions on how to accomplish this.
Change Automatic Update Settings
-
Change the Java update settings through the Java Control panel
o Windows XP: Click Start > Settings > Control Panel
o Windows 7 and Vista: Click Start > Control Panel -
Type Java in the Search Control Panel located in the upper right corner.
-
Launch the Java Control Panel by double-clicking on the Java icon. The Java Control Panel appears.
-
Click the Update tab to access the settings.
-
To disable Java Update, deselect the Check for Updates Automatically check box (see Figure 2).
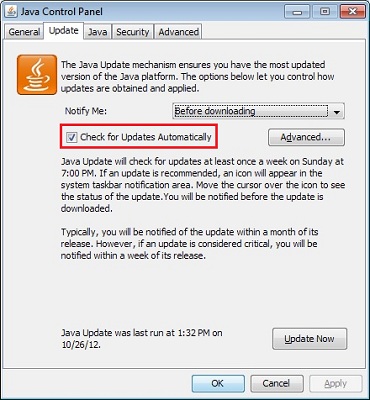
Figure 2. Disabling Java automatic updates in the Windows Java Control Panel